java的反射机制
问题:
在运行时,对一个JAVA类,能否知道属性和方法;能否调用它的任意方法?
答案是可以的,JAVA提供一种反射机制可以实现。
目录
- 什么是JAVA的反射机制
- JDK中提供的Reflection API
- JAVA反射机制提供了什么功能
- 获取类的Class对象
- 获取类的Fields
- 获取类的Method
- 获取类的Constructor
- 新建类的实例
Class<T>的函数newInstance
通过Constructor对象的方法newInstance
- 调用类的函数
调用private函数 - 设置/获取类的属性值
private属性 - 动态创建代理类
动态代理源码分析 - JAVA反射Class<T>类型源代码分析
- JAVA反射原理分析
Class文件结构
JVM加载类对象,对反射的支持 - JAVA反射的应用
一、什么是JAVA的反射机制
Java反射是Java被视为动态(或准动态)语言的一个关键性质。这个机制允许程序在运行时透过Reflection APIs取得任何一个已知名称的class的内部信息,包括其modifiers(诸如public, static 等)、superclass(例如Object)、实现之interfaces(例如Cloneable),也包括fields和methods的所有信息,并可于运行时改变fields内容或唤起methods。
Java反射机制容许程序在运行时加载、探知、使用编译期间完全未知的classes。
换言之,Java可以加载一个运行时才得知名称的class,获得其完整结构。
二、JDK中提供的Reflection API
Java反射相关的API在包java.lang.reflect中,JDK 1.6.0的reflect包如下图:
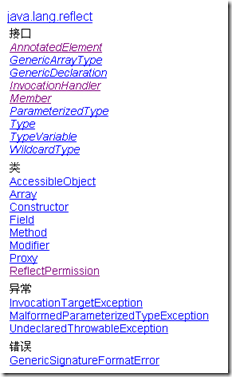
|
Member接口 |
该接口可以获取有关类成员(域或者方法)后者构造函数的信息。 |
|
AccessibleObject类 |
该类是域(field)对象、方法(method)对象、构造函数(constructor)对象的基础类。它提供了将反射的对象标记为在使用时取消默认 Java 语言访问控制检查的能力。 |
|
Array类 |
该类提供动态地生成和访问JAVA数组的方法。 |
|
Constructor类 |
提供一个类的构造函数的信息以及访问类的构造函数的接口。 |
|
Field类 |
提供一个类的域的信息以及访问类的域的接口。 |
|
Method类 |
提供一个类的方法的信息以及访问类的方法的接口。 |
|
Modifier类 |
提供了 static 方法和常量,对类和成员访问修饰符进行解码。 |
|
Proxy类 |
提供动态地生成代理类和类实例的静态方法。 |
三、JAVA反射机制提供了什么功能
Java反射机制提供如下功能:
在运行时判断任意一个对象所属的类
在运行时构造任意一个类的对象
在运行时判段任意一个类所具有的成员变量和方法
在运行时调用任一个对象的方法
在运行时创建新类对象
在使用Java的反射功能时,基本首先都要获取类的Class对象,再通过Class对象获取其他的对象。
这里首先定义用于测试的类:
View Code?
|
1 2 3 4 5 6 7 8 9 10 11 12 13 14 15 16 17 18 19 20 21 22 23 24 25 26 27 28 29 30 31 32 33 34 35 36 37 38 39 40 41 42 43 44 45 46 47 48 49 50 51 52 53 54 55 |
classType{ publicintpubIntField; publicString pubStringField; privateintprvIntField;
publicType(){ Log("Default Constructor"); }
Type(intarg1, String arg2){ pubIntField = arg1; pubStringField = arg2;
Log("Constructor with parameters"); }
publicvoidsetIntField(intval) { this.prvIntField = val; } publicintgetIntField() { returnprvIntField; }
privatevoidLog(String msg){ System.out.println("Type:"+ msg); } }
classExtendTypeextendsType{ publicintpubIntExtendField; publicString pubStringExtendField; privateintprvIntExtendField;
publicExtendType(){ Log("Default Constructor"); }
ExtendType(intarg1, String arg2){ pubIntExtendField = arg1; pubStringExtendField = arg2;
Log("Constructor with parameters"); }
publicvoidsetIntExtendField(intfield7) { this.prvIntExtendField = field7; } publicintgetIntExtendField() { returnprvIntExtendField; }
privatevoidLog(String msg){ System.out.println("ExtendType:"+ msg); } }
|
1、获取类的Class对象
Class 类的实例表示正在运行的 Java 应用程序中的类和接口。获取类的Class对象有多种方式:
|
调用getClass |
Boolean var1 = true; Class<?> classType2 = var1.getClass(); System.out.println(classType2); 输出:class java.lang.Boolean |
|
运用.class 语法 |
Class<?> classType4 = Boolean.class; System.out.println(classType4); 输出:class java.lang.Boolean |
|
运用static method Class.forName() |
Class<?> classType5 = Class.forName("java.lang.Boolean"); System.out.println(classType5); 输出:class java.lang.Boolean |
|
运用primitive wrapper classes的TYPE 语法 这里返回的是原生类型,和Boolean.class返回的不同 |
Class<?> classType3 = Boolean.TYPE; System.out.println(classType3); 输出:boolean |
2、获取类的Fields
可以通过反射机制得到某个类的某个属性,然后改变对应于这个类的某个实例的该属性值。JAVA 的Class<T>类提供了几个方法获取类的属性。
|
返回一个 Field 对象,它反映此 Class 对象所表示的类或接口的指定公共成员字段 |
|
|
public Field[] getFields() |
返回一个包含某些 Field 对象的数组,这些对象反映此 Class 对象所表示的类或接口的所有可访问公共字段 |
|
返回一个 Field 对象,该对象反映此 Class 对象所表示的类或接口的指定已声明字段 |
|
|
public Field[] getDeclaredFields() |
返回 Field 对象的一个数组,这些对象反映此 Class 对象所表示的类或接口所声明的所有字段 |
View Code?
|
1 2 3 4 5 6 7 8 9 10 11 12 13 14 15 16 17 |
Class<?> classType = ExtendType.class;
// 使用getFields获取属性 Field[] fields = classType.getFields(); for(Field f : fields) { System.out.println(f); }
System.out.println();
// 使用getDeclaredFields获取属性 fields = classType.getDeclaredFields(); for(Field f : fields) { System.out.println(f); }
|
输出:
public int com.quincy.ExtendType.pubIntExtendField
public java.lang.String com.quincy.ExtendType.pubStringExtendField
public int com.quincy.Type.pubIntField
public java.lang.String com.quincy.Type.pubStringField
public int com.quincy.ExtendType.pubIntExtendField
public java.lang.String com.quincy.ExtendType.pubStringExtendField
private int com.quincy.ExtendType.prvIntExtendField
可见getFields和getDeclaredFields区别:
getFields返回的是申明为public的属性,包括父类中定义,
getDeclaredFields返回的是指定类定义的所有定义的属性,不包括父类的。
3、获取类的Method
通过反射机制得到某个类的某个方法,然后调用对应于这个类的某个实例的该方法
Class<T>类提供了几个方法获取类的方法。
|
public Method getMethod(String name, Class<?>... parameterTypes) |
返回一个 Method 对象,它反映此 Class 对象所表示的类或接口的指定公共成员方法 |
|
public Method[] getMethods() |
返回一个包含某些 Method 对象的数组,这些对象反映此 Class 对象所表示的类或接口(包括那些由该类或接口声明的以及从超类和超接口继承的那些的类或接口)的公共 member 方法 |
|
public Method getDeclaredMethod(String name,Class<?>... parameterTypes) |
返回一个 Method 对象,该对象反映此 Class 对象所表示的类或接口的指定已声明方法 |
|
public Method[] getDeclaredMethods() |
返回 Method 对象的一个数组,这些对象反映此 Class 对象表示的类或接口声明的所有方法,包括公共、保护、默认(包)访问和私有方法,但不包括继承的方法 |
View Code?
|
1 2 3 4 5 6 7 8 9 10 11 12 13 14 15 16 |
// 使用getMethods获取函数 Class<?> classType = ExtendType.class; Method[] methods = classType.getMethods(); for(Method m : methods) { System.out.println(m); }
System.out.println();
// 使用getDeclaredMethods获取函数 methods = classType.getDeclaredMethods(); for(Method m : methods) { System.out.println(m); }
|
输出:
public void com.quincy.ExtendType.setIntExtendField(int)
public int com.quincy.ExtendType.getIntExtendField()
public void com.quincy.Type.setIntField(int)
public int com.quincy.Type.getIntField()
public final native void java.lang.Object.wait(long) throws java.lang.InterruptedException
public final void java.lang.Object.wait() throws java.lang.InterruptedException
public final void java.lang.Object.wait(long,int) throws java.lang.InterruptedException
public boolean java.lang.Object.equals(java.lang.Object)
public java.lang.String java.lang.Object.toString()
public native int java.lang.Object.hashCode()
public final native java.lang.Class java.lang.Object.getClass()
public final native void java.lang.Object.notify()
public final native void java.lang.Object.notifyAll()
private void com.quincy.ExtendType.Log(java.lang.String)
public void com.quincy.ExtendType.setIntExtendField(int)
public int com.quincy.ExtendType.getIntExtendField()
4、获取类的Constructor
通过反射机制得到某个类的构造器,然后调用该构造器创建该类的一个实例
Class<T>类提供了几个方法获取类的构造器。
|
public Constructor<T> getConstructor(Class<?>... parameterTypes) |
返回一个 Constructor 对象,它反映此 Class 对象所表示的类的指定公共构造方法 |
|
public Constructor<?>[] getConstructors() |
返回一个包含某些 Constructor 对象的数组,这些对象反映此 Class 对象所表示的类的所有公共构造方法 |
|
public Constructor<T> getDeclaredConstructor(Class<?>... parameterTypes) |
返回一个 Constructor 对象,该对象反映此 Class 对象所表示的类或接口的指定构造方法 |
|
public Constructor<?>[] getDeclaredConstructors() |
返回 Constructor 对象的一个数组,这些对象反映此 Class 对象表示的类声明的所有构造方法。它们是公共、保护、默认(包)访问和私有构造方法 |
View Code?
|
1 2 3 4 5 6 7 8 9 10 11 12 13 14 15 16 17 18 19 20 21 |
// 使用getConstructors获取构造器 Constructor<?>[] constructors = classType.getConstructors(); for(Constructor<?> m : constructors) { System.out.println(m); }
System.out.println();
// 使用getDeclaredConstructors获取构造器 constructors = classType.getDeclaredConstructors(); for(Constructor<?> m : constructors) { System.out.println(m); }
输出: publiccom.quincy.ExtendType()
publiccom.quincy.ExtendType() com.quincy.ExtendType(int,java.lang.String)
|
5、新建类的实例
通过反射机制创建新类的实例,有几种方法可以创建
|
调用无自变量ctor |
1、调用类的Class对象的newInstance方法,该方法会调用对象的默认构造器,如果没有默认构造器,会调用失败. Class<?> classType = ExtendType.class; Object inst = classType.newInstance(); System.out.println(inst); 输出: Type:Default Constructor ExtendType:Default Constructor
2、调用默认Constructor对象的newInstance方法 Class<?> classType = ExtendType.class; Constructor<?> constructor1 = classType.getConstructor(); Object inst = constructor1.newInstance(); System.out.println(inst); 输出: Type:Default Constructor ExtendType:Default Constructor com.quincy.ExtendType@1006d75 |
|
调用带参数ctor |
3、调用带参数Constructor对象的newInstance方法 Constructor<?> constructor2 = classType.getDeclaredConstructor(int.class, String.class); Object inst = constructor2.newInstance(1, "123"); System.out.println(inst); 输出: Type:Default Constructor ExtendType:Constructor with parameters com.quincy.ExtendType@15e83f9 |
6、调用类的函数
通过反射获取类Method对象,调用Field的Invoke方法调用函数。
View Code?
|
1 2 3 4 5 6 7 8 9 10 11 12 13 14 15 16 |
Class<?> classType = ExtendType.class; Object inst = classType.newInstance(); Method logMethod = classType.<STRONG>getDeclaredMethod</STRONG>("Log", String.class); logMethod.invoke(inst,"test");
输出: Type:Default Constructor ExtendType:Default Constructor <FONT color=#ff0000>Class com.quincy.ClassT can not access a member ofclasscom.quincy.ExtendType with modifiers"private"</FONT>
<FONT color=#ff0000>上面失败是由于没有权限调用private函数,这里需要设置Accessible为true;</FONT> Class<?> classType = ExtendType.class; Object inst = classType.newInstance(); Method logMethod = classType.getDeclaredMethod("Log", String.class); <FONT color=#ff0000>logMethod.setAccessible(true);</FONT> logMethod.invoke(inst,"test");
|
7、设置/获取类的属性值
通过反射获取类的Field对象,调用Field方法设置或获取值
View Code?
|
1 2 3 4 5 |
Class<?> classType = ExtendType.class; Object inst = classType.newInstance(); Field intField = classType.getField("pubIntExtendField"); intField.<STRONG>setInt</STRONG>(inst,100); intvalue = intField.<STRONG>getInt</STRONG>(inst);
|
View Code?
|
1 |
|
四、动态创建代理类
代理模式:代理模式的作用=为其他对象提供一种代理以控制对这个对象的访问。
代理模式的角色:
抽象角色:声明真实对象和代理对象的共同接口
代理角色:代理角色内部包含有真实对象的引用,从而可以操作真实对象。
真实角色:代理角色所代表的真实对象,是我们最终要引用的对象。
动态代理:
|
java.lang.reflect.Proxy |
Proxy 提供用于创建动态代理类和实例的静态方法,它还是由这些方法创建的所有动态代理类的超类 |
|
InvocationHandler |
是代理实例的调用处理程序 实现的接口,每个代理实例都具有一个关联的调用处理程序。对代理实例调用方法时,将对方法调用进行编码并将其指派到它的调用处理程序的 invoke 方法。 |
动态Proxy是这样的一种类:
它是在运行生成的类,在生成时你必须提供一组Interface给它,然后该class就宣称它实现了这些interface。你可以把该class的实例当作这些interface中的任何一个来用。当然,这个Dynamic Proxy其实就是一个Proxy,它不会替你作实质性的工作,在生成它的实例时你必须提供一个handler,由它接管实际的工作。
在使用动态代理类时,我们必须实现InvocationHandler接口
步骤:
1、定义抽象角色
public interface Subject {
public void Request();
}
2、定义真实角色
public class RealSubject implements Subject {
@Override
public void Request() {
// TODO Auto-generated method stub
System.out.println("RealSubject");
}
}
3、定义代理角色
public class DynamicSubject implements InvocationHandler {
private Object sub;
public DynamicSubject(Object obj){
this.sub = obj;
}
@Override
public Object invoke(Object proxy, Method method, Object[] args)
throws Throwable {
// TODO Auto-generated method stub
System.out.println("Method:"+ method + ",Args:" + args);
method.invoke(sub, args);
return null;
}
}
4、通过Proxy.newProxyInstance构建代理对象
RealSubject realSub = new RealSubject();
InvocationHandler handler = new DynamicSubject(realSub);
Class<?> classType = handler.getClass();
Subject sub = (Subject)Proxy.newProxyInstance(classType.getClassLoader(),
realSub.getClass().getInterfaces(), handler);
System.out.println(sub.getClass());
5、通过调用代理对象的方法去调用真实角色的方法。
sub.Request();
输出:
class $Proxy0 新建的代理对象,它实现指定的接口
Method:public abstract void DynamicProxy.Subject.Request(),Args:null
RealSubject 调用的真实对象的方法
==========================================================
本篇文章依旧采用小例子来说明,因为我始终觉的,案例驱动是最好的,要不然只看理论的话,看了也不懂,不过建议大家在看完文章之后,在回过头去看看理论,会有更好的理解。
下面开始正文。
【案例1】通过一个对象获得完整的包名和类名
?
|
1 2 3 4 5 6 7 8 9 10 11 12 13 14 15 |
packageReflect;
/** * 通过一个对象获得完整的包名和类名 * */ classDemo{ //other codes... }
classhello{ publicstaticvoidmain(String[] args) { Demo demo=newDemo(); System.out.println(demo.getClass().getName()); } }
|
【运行结果】:Reflect.Demo
添加一句:所有类的对象其实都是Class的实例。
【案例2】实例化Class类对象
?
|
1 2 3 4 5 6 7 8 9 10 11 12 13 14 15 16 17 18 19 20 21 22 23 24 25 |
packageReflect; classDemo{ //other codes... }
classhello{ publicstaticvoidmain(String[] args) { Class<?> demo1=null; Class<?> demo2=null; Class<?> demo3=null; try{ //一般尽量采用这种形式 demo1=Class.forName("Reflect.Demo"); }catch(Exception e){ e.printStackTrace(); } demo2=newDemo().getClass(); demo3=Demo.class;
System.out.println("类名称 "+demo1.getName()); System.out.println("类名称 "+demo2.getName()); System.out.println("类名称 "+demo3.getName());
} }
|
【运行结果】:
类名称 Reflect.Demo
类名称 Reflect.Demo
类名称 Reflect.Demo
【案例3】通过Class实例化其他类的对象
通过无参构造实例化对象
?
|
1 2 3 4 5 6 7 8 9 10 11 12 13 14 15 16 17 18 19 20 21 22 23 24 25 26 27 28 29 30 31 32 33 34 35 36 37 38 39 40 41 42 43 44 45 46 47 |
packageReflect;
classPerson{
publicString getName() { returnname; } publicvoidsetName(String name) { this.name = name; } publicintgetAge() { returnage; } publicvoidsetAge(intage) { this.age = age; } @Override publicString toString(){ return"["+this.name+" "+this.age+"]"; } privateString name; privateintage; }
classhello{ publicstaticvoidmain(String[] args) { Class<?> demo=null; try{ demo=Class.forName("Reflect.Person"); }catch(Exception e) { e.printStackTrace(); } Person per=null; try{ per=(Person)demo.newInstance(); }catch(InstantiationException e) { // TODO Auto-generated catch block e.printStackTrace(); }catch(IllegalAccessException e) { // TODO Auto-generated catch block e.printStackTrace(); } per.setName("Rollen"); per.setAge(20); System.out.println(per); } }
|
【运行结果】:
[Rollen 20]
但是注意一下,当我们把Person中的默认的无参构造函数取消的时候,比如自己定义只定义一个有参数的构造函数之后,会出现错误:
比如我定义了一个构造函数:
?
|
1 2 3 4 |
publicPerson(String name,intage) { this.age=age; this.name=name; }
|
然后继续运行上面的程序,会出现:
java.lang.InstantiationException: Reflect.Person
at java.lang.Class.newInstance0(Class.java:340)
at java.lang.Class.newInstance(Class.java:308)
at Reflect.hello.main(hello.java:39)
Exception in thread "main"java.lang.NullPointerException
at Reflect.hello.main(hello.java:47)
所以大家以后再编写使用Class实例化其他类的对象的时候,一定要自己定义无参的构造函数
【案例】通过Class调用其他类中的构造函数 (也可以通过这种方式通过Class创建其他类的对象)
?
|
1 2 3 4 5 6 7 8 9 10 11 12 13 14 15 16 17 18 19 20 21 22 23 24 25 26 27 28 29 30 31 32 33 34 35 36 37 38 39 40 41 42 43 44 45 46 47 48 49 50 51 52 53 54 55 56 57 58 59 60 61 |
packageReflect;
importjava.lang.reflect.Constructor;
classPerson{
publicPerson() {
} publicPerson(String name){ this.name=name; } publicPerson(intage){ this.age=age; } publicPerson(String name,intage) { this.age=age; this.name=name; } publicString getName() { returnname; } publicintgetAge() { returnage; } @Override publicString toString(){ return"["+this.name+" "+this.age+"]"; } privateString name; privateintage; }
classhello{ publicstaticvoidmain(String[] args) { Class<?> demo=null; try{ demo=Class.forName("Reflect.Person"); }catch(Exception e) { e.printStackTrace(); } Person per1=null; Person per2=null; Person per3=null; Person per4=null; //取得全部的构造函数 Constructor<?> cons[]=demo.getConstructors(); try{ per1=(Person)cons[0].newInstance(); per2=(Person)cons[1].newInstance("Rollen"); per3=(Person)cons[2].newInstance(20); per4=(Person)cons[3].newInstance("Rollen",20); }catch(Exception e){ e.printStackTrace(); } System.out.println(per1); System.out.println(per2); System.out.println(per3); System.out.println(per4); } }
|
【运行结果】:
[null 0]
[Rollen 0]
[null 20]
[Rollen 20]
【案例】
返回一个类实现的接口:
?
|
1 2 3 4 5 6 7 8 9 10 11 12 13 14 15 16 17 18 19 20 21 22 23 24 25 26 27 28 29 30 31 32 33 34 35 36 37 38 39 40 41 42 43 44 45 46 47 48 |
packageReflect;
interfaceChina{ publicstaticfinalString name="Rollen"; publicstatic int age=20; publicvoidsayChina(); publicvoidsayHello(String name,intage); }
classPersonimplementsChina{ publicPerson() {
} publicPerson(String sex){ this.sex=sex; } publicString getSex() { returnsex; } publicvoidsetSex(String sex) { this.sex = sex; } @Override publicvoidsayChina(){ System.out.println("hello ,china"); } @Override publicvoidsayHello(String name,intage){ System.out.println(name+" "+age); } privateString sex; }
classhello{ publicstaticvoidmain(String[] args) { Class<?> demo=null; try{ demo=Class.forName("Reflect.Person"); }catch(Exception e) { e.printStackTrace(); } //保存所有的接口 Class<?> intes[]=demo.getInterfaces(); for(inti =0; i < intes.length; i++) { System.out.println("实现的接口 "+intes[i].getName()); } } }
|
【运行结果】:
实现的接口 Reflect.China
(注意,以下几个例子,都会用到这个例子的Person类,所以为节省篇幅,此处不再粘贴Person的代码部分,只粘贴主类hello的代码)
【案例】:取得其他类中的父类
?
|
1 2 3 4 5 6 7 8 9 10 11 12 13 |
classhello{ publicstaticvoidmain(String[] args) { Class<?> demo=null; try{ demo=Class.forName("Reflect.Person"); }catch(Exception e) { e.printStackTrace(); } //取得父类 Class<?> temp=demo.getSuperclass(); System.out.println("继承的父类为: "+temp.getName()); } }
|
【运行结果】
继承的父类为: java.lang.Object
【案例】:获得其他类中的全部构造函数
这个例子需要在程序开头添加import java.lang.reflect.*;
然后将主类编写为:
?
|
1 2 3 4 5 6 7 8 9 10 11 12 13 14 |
classhello{ publicstaticvoidmain(String[] args) { Class<?> demo=null; try{ demo=Class.forName("Reflect.Person"); }catch(Exception e) { e.printStackTrace(); } Constructor<?>cons[]=demo.getConstructors(); for(inti =0; i < cons.length; i++) { System.out.println("构造方法: "+cons[i]); } } }
|
【运行结果】:
构造方法: public Reflect.Person()
构造方法: public Reflect.Person(java.lang.String)
但是细心的读者会发现,上面的构造函数没有public或者private这一类的修饰符
下面这个例子我们就来获取修饰符
?
|
1 2 3 4 5 6 7 8 9 10 11 12 13 14 15 16 17 18 19 20 21 22 23 24 25 26 |
classhello{ publicstaticvoidmain(String[] args) { Class<?> demo=null; try{ demo=Class.forName("Reflect.Person"); }catch(Exception e) { e.printStackTrace(); } Constructor<?>cons[]=demo.getConstructors(); for(inti =0; i < cons.length; i++) { Class<?> p[]=cons[i].getParameterTypes(); System.out.print("构造方法: "); intmo=cons[i].getModifiers(); System.out.print(Modifier.toString(mo)+" "); System.out.print(cons[i].getName()); System.out.print("("); for(intj=0;j<p.length;++j){ System.out.print(p[j].getName()+" arg"+i); if(j<p.length-1){ System.out.print(","); } } System.out.println("){}"); } } }
|
【运行结果】:
构造方法: public Reflect.Person(){}
构造方法: public Reflect.Person(java.lang.String arg1){}
有时候一个方法可能还有异常,呵呵。下面看看:
?
|
1 2 3 4 5 6 7 8 9 10 11 12 13 14 15 16 17 18 19 20 21 22 23 24 25 26 27 28 29 30 31 32 33 34 35 36 37 38 39 |
classhello{ publicstaticvoidmain(String[] args) { Class<?> demo=null; try{ demo=Class.forName("Reflect.Person"); }catch(Exception e) { e.printStackTrace(); } Method method[]=demo.getMethods(); for(inti=0;i<method.length;++i){ Class<?> returnType=method[i].getReturnType(); Class<?> para[]=method[i].getParameterTypes(); inttemp=method[i].getModifiers(); System.out.print(Modifier.toString(temp)+" "); System.out.print(returnType.getName()+" "); System.out.print(method[i].getName()+" "); System.out.print("("); for(intj=0;j<para.length;++j){ System.out.print(para[j].getName()+" "+"arg"+j); if(j<para.length-1){ System.out.print(","); } } Class<?> exce[]=method[i].getExceptionTypes(); if(exce.length>0){ System.out.print(") throws "); for(intk=0;k<exce.length;++k){ System.out.print(exce[k].getName()+" "); if(k<exce.length-1){ System.out.print(","); } } }else{ System.out.print(")"); } System.out.println(); } } }
|
【运行结果】:
public java.lang.String getSex ()
public void setSex (java.lang.String arg0)
public void sayChina ()
public void sayHello (java.lang.String arg0,int arg1)
public final native void wait (long arg0) throwsjava.lang.InterruptedException
public final void wait () throwsjava.lang.InterruptedException
public final void wait (long arg0,int arg1) throwsjava.lang.InterruptedException
public boolean equals (java.lang.Object arg0)
public java.lang.String toString ()
public native int hashCode ()
public final native java.lang.Class getClass ()
public final native void notify ()
public final native void notifyAll ()
【案例】接下来让我们取得其他类的全部属性吧,最后我讲这些整理在一起,也就是通过class取得一个类的全部框架
?
|
1 2 3 4 5 6 7 8 9 10 11 12 13 14 15 16 17 18 19 20 21 22 23 24 25 26 27 28 29 30 31 32 33 34 |
classhello { publicstaticvoidmain(String[] args) { Class<?> demo =null; try{ demo = Class.forName("Reflect.Person"); }catch(Exception e) { e.printStackTrace(); } System.out.println("===============本类属性========================"); // 取得本类的全部属性 Field[] field = demo.getDeclaredFields(); for(inti =0; i < field.length; i++) { // 权限修饰符 intmo = field[i].getModifiers(); String priv = Modifier.toString(mo); // 属性类型 Class<?> type = field[i].getType(); System.out.println(priv +" "+ type.getName() +" " + field[i].getName() +";"); } System.out.println("===============实现的接口或者父类的属性========================"); // 取得实现的接口或者父类的属性 Field[] filed1 = demo.getFields(); for(intj =0; j < filed1.length; j++) { // 权限修饰符 intmo = filed1[j].getModifiers(); String priv = Modifier.toString(mo); // 属性类型 Class<?> type = filed1[j].getType(); System.out.println(priv +" "+ type.getName() +" " + filed1[j].getName() +";"); } } }
|
【运行结果】:
===============本类属性========================
private java.lang.String sex;
===============实现的接口或者父类的属性========================
public static final java.lang.String name;
public static final int age;
【案例】其实还可以通过反射调用其他类中的方法:
?
|
1 2 3 4 5 6 7 8 9 10 11 12 13 14 15 16 17 18 19 20 21 |
classhello { publicstaticvoidmain(String[] args) { Class<?> demo =null; try{ demo = Class.forName("Reflect.Person"); }catch(Exception e) { e.printStackTrace(); } try{ //调用Person类中的sayChina方法 Method method=demo.getMethod("sayChina"); method.invoke(demo.newInstance()); //调用Person的sayHello方法 method=demo.getMethod("sayHello", String.class,int.class); method.invoke(demo.newInstance(),"Rollen",20);
}catch(Exception e) { e.printStackTrace(); } } }
|
【运行结果】:
hello ,china
Rollen 20
【案例】调用其他类的set和get方法
?
|
1 2 3 4 5 6 7 8 9 10 11 12 13 14 15 16 17 18 19 20 21 22 23 24 25 26 27 28 29 30 31 32 33 34 35 36 37 38 39 40 41 42 43 44 45 46 47 48 49 50 51 52 53 |
classhello { publicstaticvoidmain(String[] args) { Class<?> demo =null; Object obj=null; try{ demo = Class.forName("Reflect.Person"); }catch(Exception e) { e.printStackTrace(); } try{ obj=demo.newInstance(); }catch(Exception e) { e.printStackTrace(); } setter(obj,"Sex","男",String.class); getter(obj,"Sex"); }
/** * @param obj * 操作的对象 * @param att * 操作的属性 * */ publicstaticvoidgetter(Object obj, String att) { try{ Method method = obj.getClass().getMethod("get"+ att); System.out.println(method.invoke(obj)); }catch(Exception e) { e.printStackTrace(); } }
/** * @param obj * 操作的对象 * @param att * 操作的属性 * @param value * 设置的值 * @param type * 参数的属性 * */ publicstaticvoidsetter(Object obj, String att, Object value, Class<?> type) { try{ Method method = obj.getClass().getMethod("set"+ att, type); method.invoke(obj, value); }catch(Exception e) { e.printStackTrace(); } } }// end class
|
【运行结果】:
男
【案例】通过反射操作属性
?
|
1 2 3 4 5 6 7 8 9 10 11 12 13 14 |
classhello { publicstaticvoidmain(String[] args)throwsException { Class<?> demo =null; Object obj =null;
demo = Class.forName("Reflect.Person"); obj = demo.newInstance();
Field field = demo.getDeclaredField("sex"); field.setAccessible(true); field.set(obj,"男"); System.out.println(field.get(obj)); } }// end class
|
【案例】通过反射取得并修改数组的信息:
?
|
1 2 3 4 5 6 7 8 9 10 11 12 |
importjava.lang.reflect.*; classhello{ publicstaticvoidmain(String[] args) { int[] temp={1,2,3,4,5}; Class<?>demo=temp.getClass().getComponentType(); System.out.println("数组类型: "+demo.getName()); System.out.println("数组长度 "+Array.getLength(temp)); System.out.println("数组的第一个元素: "+Array.get(temp,0)); Array.set(temp,0,100); System.out.println("修改之后数组第一个元素为: "+Array.get(temp,0)); } }
|
【运行结果】:
数组类型: int
数组长度 5
数组的第一个元素: 1
修改之后数组第一个元素为: 100
【案例】通过反射修改数组大小
?
|
1 2 3 4 5 6 7 8 9 10 11 12 13 14 15 16 17 18 19 20 21 22 23 24 25 26 27 28 29 30 31 32 33 34 35 |
classhello{ publicstaticvoidmain(String[] args) { int[] temp={1,2,3,4,5,6,7,8,9}; int[] newTemp=(int[])arrayInc(temp,15); print(newTemp); System.out.println("====================="); String[] atr={"a","b","c"}; String[] str1=(String[])arrayInc(atr,8); print(str1); }
/** * 修改数组大小 * */ publicstaticObject arrayInc(Object obj,intlen){ Class<?>arr=obj.getClass().getComponentType(); Object newArr=Array.newInstance(arr, len); intco=Array.getLength(obj); System.arraycopy(obj,0, newArr,0, co); returnnewArr; } /** * 打印 * */ publicstaticvoidprint(Object obj){ Class<?>c=obj.getClass(); if(!c.isArray()){ return; } System.out.println("数组长度为: "+Array.getLength(obj)); for(inti =0; i < Array.getLength(obj); i++) { System.out.print(Array.get(obj, i)+" "); } } }
|
【运行结果】:
数组长度为: 15
1 2 3 4 5 6 7 8 9 0 0 0 0 0 0 =====================
数组长度为: 8
a b c null null null null null
动态代理
【案例】首先来看看如何获得类加载器:
?
|
1 2 3 4 5 6 7 8 9 |
classtest{
} classhello{ publicstaticvoidmain(String[] args) { test t=newtest(); System.out.println("类加载器 "+t.getClass().getClassLoader().getClass().getName()); } }
|
【程序输出】:
类加载器 sun.misc.Launcher$AppClassLoader
其实在java中有三种类类加载器。
1)Bootstrap ClassLoader此加载器采用c++编写,一般开发中很少见。
2)Extension ClassLoader用来进行扩展类的加载,一般对应的是jre\lib\ext目录中的类
3)AppClassLoader加载classpath指定的类,是最常用的加载器。同时也是java中默认的加载器。
如果想要完成动态代理,首先需要定义一个InvocationHandler接口的子类,已完成代理的具体操作。
?
|
1 2 3 4 5 6 7 8 9 10 11 12 13 14 15 16 17 18 19 20 21 22 23 24 25 26 27 28 29 30 31 32 33 34 35 36 37 38 39 40 41 |
packageReflect; importjava.lang.reflect.*;
//定义项目接口 interfaceSubject { publicString say(String name,intage); }
// 定义真实项目 classRealSubjectimplementsSubject { @Override publicString say(String name,intage) { returnname +" "+ age; } }
classMyInvocationHandlerimplementsInvocationHandler { privateObject obj =null;
publicObject bind(Object obj) { this.obj = obj; returnProxy.newProxyInstance(obj.getClass().getClassLoader(), obj .getClass().getInterfaces(),this); }
@Override publicObject invoke(Object proxy, Method method, Object[] args) throwsThrowable { Object temp = method.invoke(this.obj, args); returntemp; } }
classhello { publicstaticvoidmain(String[] args) { MyInvocationHandler demo =newMyInvocationHandler(); Subject sub = (Subject) demo.bind(newRealSubject()); String info = sub.say("Rollen",20); System.out.println(info); } }
|
【运行结果】:
Rollen 20
类的生命周期
在一个类编译完成之后,下一步就需要开始使用类,如果要使用一个类,肯定离不开JVM。在程序执行中JVM通过装载,链接,初始化这3个步骤完成。
类的装载是通过类加载器完成的,加载器将.class文件的二进制文件装入JVM的方法区,并且在堆区创建描述这个类的java.lang.Class对象。用来封装数据。但是同一个类只会被类装载器装载以前
链接就是把二进制数据组装为可以运行的状态。
链接分为校验,准备,解析这3个阶段
校验一般用来确认此二进制文件是否适合当前的JVM(版本),
准备就是为静态成员分配内存空间,。并设置默认值
解析指的是转换常量池中的代码作为直接引用的过程,直到所有的符号引用都可以被运行程序使用(建立完整的对应关系)
完成之后,类型也就完成了初始化,初始化之后类的对象就可以正常使用了,直到一个对象不再使用之后,将被垃圾回收。释放空间。
当没有任何引用指向Class对象时就会被卸载,结束类的生命周期
将反射用于工厂模式
先来看看,如果不用反射的时候,的工厂模式吧:
http://www.cnblogs.com/rollenholt/archive/2011/08/18/2144851.html
?
|
1 2 3 4 5 6 7 8 9 10 11 12 13 14 15 16 17 18 19 20 21 22 23 24 25 26 27 28 29 30 31 32 33 34 35 36 37 38 39 40 41 |
/** * @author Rollen-Holt 设计模式之 工厂模式 */
interfacefruit{ publicabstractvoideat(); }
classAppleimplementsfruit{ publicvoideat(){ System.out.println("Apple"); } }
classOrangeimplementsfruit{ publicvoideat(){ System.out.println("Orange"); } }
// 构造工厂类 // 也就是说以后如果我们在添加其他的实例的时候只需要修改工厂类就行了 classFactory{ publicstaticfruit getInstance(String fruitName){ fruit f=null; if("Apple".equals(fruitName)){ f=newApple(); } if("Orange".equals(fruitName)){ f=newOrange(); } returnf; } } classhello{ publicstaticvoidmain(String[] a){ fruit f=Factory.getInstance("Orange"); f.eat(); }
}
|
这样,当我们在添加一个子类的时候,就需要修改工厂类了。如果我们添加太多的子类的时候,改的就会很多。
现在我们看看利用反射机制:
?
|
1 2 3 4 5 6 7 8 9 10 11 12 13 14 15 16 17 18 19 20 21 22 23 24 25 26 27 28 29 30 31 32 33 34 35 36 37 |
packageReflect;
interfacefruit{ publicabstractvoideat(); }
classAppleimplementsfruit{ publicvoideat(){ System.out.println("Apple"); } }
classOrangeimplementsfruit{ publicvoideat(){ System.out.println("Orange"); } }
classFactory{ publicstaticfruit getInstance(String ClassName){ fruit f=null; try{ f=(fruit)Class.forName(ClassName).newInstance(); }catch(Exception e) { e.printStackTrace(); } returnf; } } classhello{ publicstaticvoidmain(String[] a){ fruit f=Factory.getInstance("Reflect.Apple"); if(f!=null){ f.eat(); } } }
|
现在就算我们添加任意多个子类的时候,工厂类就不需要修改。
上面的爱吗虽然可以通过反射取得接口的实例,但是需要传入完整的包和类名。而且用户也无法知道一个接口有多少个可以使用的子类,所以我们通过属性文件的形式配置所需要的子类。
下面我们来看看: 结合属性文件的工厂模式
首先创建一个fruit.properties的资源文件,
内容为:
?
|
1 2 |
apple=Reflect.Apple orange=Reflect.Orange
|
然后编写主类代码:
?
|
1 2 3 4 5 6 7 8 9 10 11 12 13 14 15 16 17 18 19 20 21 22 23 24 25 26 27 28 29 30 31 32 33 34 35 36 37 38 39 40 41 42 43 44 45 46 47 48 49 50 51 52 53 54 55 56 57 |
packageReflect;
importjava.io.*; importjava.util.*;
interfacefruit{ publicabstractvoideat(); }
classAppleimplementsfruit{ publicvoideat(){ System.out.println("Apple"); } }
classOrangeimplementsfruit{ publicvoideat(){ System.out.println("Orange"); } }
//操作属性文件类 classinit{ publicstaticProperties getPro()throwsFileNotFoundException, IOException{ Properties pro=newProperties(); File f=newFile("fruit.properties"); if(f.exists()){ pro.load(newFileInputStream(f)); }else{ pro.setProperty("apple","Reflect.Apple"); pro.setProperty("orange","Reflect.Orange"); pro.store(newFileOutputStream(f),"FRUIT CLASS"); } returnpro; } }
classFactory{ publicstaticfruit getInstance(String ClassName){ fruit f=null; try{ f=(fruit)Class.forName(ClassName).newInstance(); }catch(Exception e) { e.printStackTrace(); } returnf; } } classhello{ publicstaticvoidmain(String[] a)throwsFileNotFoundException, IOException{ Properties pro=init.getPro(); fruit f=Factory.getInstance(pro.getProperty("apple")); if(f!=null){ f.eat(); } } }
|
【运行结果】:Apple
本教程由尚硅谷教育大数据研究院出品,如需转载请注明来源,欢迎大家关注尚硅谷公众号(atguigu)了解更多。